
Free Shipping on all orders $49+ at Peets.com
Cherry pie is favored in the Midwest. A recent study of pie sales revealed that cherry pie is most popular in the “cherry belt” running from Arizona to West Virginia.(Instacart Reveals America’s Favorite Pies.) It’s important to note that there are two types of cherries – sweet and tart. If you grabbed a few cherries in the grocery store and thought they were too bitter, chances are they were tart cherries.
I’ll never forget the cherry pie I made after accidentally buying tart cherries instead of sweet ones. I wrongfully thought all cherries were the same. I expected the filling to taste rich and fruity, but the first bite caught me completely off guard with its sharp, bitter flavor. Even with extra sugar, the cherries kept their bold tang that puckered my mouth. The crust turned out perfectly golden and flaky, which somehow saved the dessert from disaster. By the next day, the flavors mellowed slightly, and the pie actually became one of the most memorable pies I had ever baked.
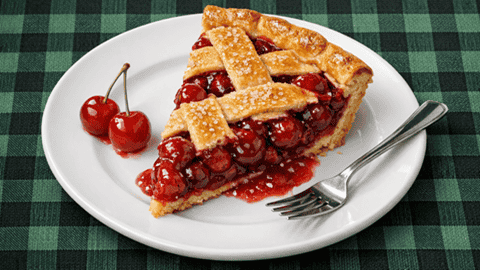
This quick and easy cherry pie recipe uses canned cherry pie filling, so you don’t need to worry about choosing the right type of cherries. It also uses refrigerated pie crust, further reducing the prep time. It can be ready for the oven in under 10 minutes. This considerably cuts down the prep time over a classic cherry pie. Be sure to take the crusts out of the refrigerator ahead of time, as directed on the packaging. It should sit at room temperature before you try unrolling it.
If you’re a big fan of cherry pie, you might want to consider making your own filling. It’s really not that difficult but it does take a lot longer than opening a can. This is a quick and easy pie recipe. If you plan on making more cherry pies in the near future, check out our Articles: How To Make Cherry Pie Filling From Fresh Cherries.

Some critics claim canned pie fillings never have enough flavor or spices. The fillings are advertised as toppings that can put on just about everything. To ensure that the flavor of the cherries really pops, we’ve added vanilla and almond extracts to the canned filling. If you’re not a fan of almond or allergic to them, you can substitute the almond extract with additional vanilla.
Cherry pie made with canned filling and a refrigerated crust is easy to make because the two most time‑consuming steps—prepping the fruit and making the dough—are completely eliminated. The canned cherry filling is already thickened, sweet‑tart, and ready to pour, so there’s no pitting cherries, cooking them down, or adjusting sugar and cornstarch. You simply open the can, add a couple ingredients, spread the filling into the crust, and the pie is already half finished. It bakes up glossy and vibrant with almost no hands‑on work.
Free Shipping on all orders $49+ at Peets.com
The premade refrigerated crust adds to the simplicity by giving you a perfectly shaped, flaky base without any mixing, rolling, or chilling. It unrolls smoothly, fits neatly into the pie dish, and browns beautifully in the oven. Whether you add a full top crust, a lattice top, or go with a crumb topping, the pie looks homemade with minimal effort. Together, the ready‑to‑use filling and premade crust make cherry pie one of the quickest, most reliable desserts you can assemble.
What You’ll Need To Make This Pie
Utensils & Equipment
- Medium mixing bowl
- Spatula or spoon
- 9-inch deep dish pie plate
- Set of measuring spoons
- Wire cooling rack
- Sheet of aluminum foil
Key Ingredients
- Canned cherry pie filling
- All-purpose flour
- Vanilla extract
- Almond extract
- Refrigerated pie crusts
Quick & Easy Cherry Pie Recipe
Utensils & Equipment
- 1 9-inch deep dish pie plate
- 1 wire cooling rack
- 1 medium bowl
- 1 spatula or spoon
- 1 set of measuring spoons
- 2 sheet of aluminum foil
Ingredients List
- 2 cans Lucky Leaf canned Cherry Pie Filling
- 1 Tbsp all-purpose flour
- 1/2 tsp vanilla extract
- 1/2 tsp almond extract
- 2 Pillsbury pie crusts

Instructions
Preheat Oven
- Preheat oven to 425℉.
- Place a sheet of aluminum foil on the bottom rack, directly under where you'll be placing the pie.
Bottom Crust
- The crust should sit at room temperature for 15-20 minutes or as directed on the packaging. This allows the fat in the crust to soften so the crust doesn't crack while unrolling.
- Place bottom crust in pie plate. Make sure the edge hangs evenly over the top.
Mix
- In medium mixing bowl stir together the pie filling, vanilla, almond, and flour.
Fill
- Pour or spoon the filling into the bottom crust.
Top It Off
- Add the top crust. Pinch the bottom and top crusts together to create a scalloped look around the edge. You can also add a lattice crust if you know how.
- Cut 4 – 6 slits in the top crust to allow the filling to vent while baking.
Bake
- Bake at 425℉ for 35 – 45 minutes.
- Pie is done when the top crust is golden brown and filling starts to bubble.
Cool Down
- Cool on wire cooling rack for at least 2 hours.
Notes
Free Shipping on all orders $49+ at Peets.com