
Free Shipping on all orders $49+ at Peets.com
Red raspberries are a delicious treat that many people are never able to enjoy. The ones you buy in a store are picked before they’re fully ripe and often refrigerated to extend the shelf life. There’s nothing like fresh picked red raspberries straight from the bush. I realize everyone is not lucky enough to have wild raspberries growing on the side of the road, but no worries. Canned raspberry pie filling is available on almost all supermarkets.
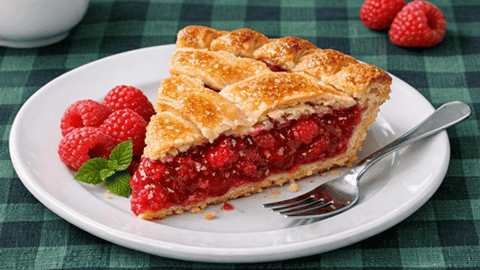
Red raspberries make an amazing meringue pie. We’ll be adding that recipe shortly. Red raspberries offer a vibrant, complex flavor—bright, tangy, and subtly sweet. Their natural acidity gives them a refreshing sweetness that makes an incredible pie. Red raspberries soften into a rich, jammy filling that pairs beautifully with flaky crusts.
This quick and easy recipe uses canned raspberry pie filling. The pie can be assembled in a mere 5 minutes and on your cooling rack in less than an hour. To the canned pie filling we’ll be adding additional spices to really bring the flavor to life. This recipe also uses refrigerated pie crusts. Be sure to allow the crusts to sit at room temperature for 15-20 minutes or as directed on the packaging. The crust must be at room temperature to create that flaky crust this pie truly deserves.
On an important note, we all have different preferences. I don’t like runny pie fillings. If you happen to want a juicy, slightly running pie, don’t add the flour. The flour was added to thicken the filling. Some recipes use tapioca and cornstarch as a thickener. Flour is most commonly used to thicken pie fillings.
Raspberry pie made with canned filling and a refrigerated crust is an easy and convenient way to enjoy the bold, bright flavor of raspberries without any of the prep work. The canned filling is already thickened and sweetened, giving you that classic sweet‑tart raspberry taste with a glossy, jam‑like texture that bakes beautifully. When it bubbles up in the oven, it releases a deep berry aroma that feels warm and nostalgic, turning a simple shortcut into a dessert that tastes surprisingly homemade. The vibrant red color and lively acidity of raspberries shine through even after baking, making each slice feel fresh and satisfying.

Pairing the raspberry filling with a refrigerated crust adds to the appeal by guaranteeing a flaky, golden base with zero fuss. The crust crisps nicely against the juicy raspberry layer, creating a satisfying contrast of textures—tender fruit, silky filling, and buttery pastry. It’s a reliable, weeknight‑friendly option that still looks impressive on the table, whether you keep it simple or add a lattice or crumb topping. Raspberry pie with canned filling and a refrigerated crust delivers maximum flavor with minimal effort, which is exactly why it’s such a beloved shortcut dessert.
Free Shipping on all orders $49+ at Peets.com
What You’ll Need
Utensils & Equipment
- 9-inch deep dish pie plate
- Medium mixing bowl
- Spatula or spoon
- Wire cooling rack
- Sheet of aluminum foil
Key Ingredients
- Canned red raspberry pie filling
- Refrigerated pie crusts
- All-purpose flour
- Ground nutmeg
- Vanilla extract
Quick & Easy Red Raspberry Pie Recipe
Utensils & Equipment
- 1 medium bowl
- 1 spatula or spoon
- 1 9-inch deep dish pie plate
- 1 wire cooling rack
- 2 sheet of aluminum foil
Ingredients List
- 2 21 ounce cans red raspberry pie filling
- 2 pie crusts
- 1/4 tsp nutmeg
- 1/2 tsp vanilla
- 1 Tbsp flour

Instructions
Preheat Oven
- Preheat the oven to 425℉
- Place a sheet of aluminum foil on the bottom rack to catch any juices that might seep from the pie while baking.
Prepare The Crust
- The crusts should sit at room temperature for 15-20 minutes or as directed on the packaging.
- Place bottom crust in pie plate. Be sure the crust is centered in the plate so the top edge is even around the rim.
Mix It Up
- In medium mixing bowl, add the raspberry pie filling, nutmeg, vanilla, and flour.
- Mix well, making sure that the flour is well blended into the filling.
Fill It Up
- Spoon the filling into the bottom crust.
Top It Off
- Add the top crust. Pinch the bottom and top crust together to create a scalloped edge. You can also do a lattice crust if you know how.
- Cut 4 – 6 slits in the top crust to allow the filling to vent while baking.
Bake
- Bake at 425℉ for 35-45 minutes.
- Pie is done when top crust is golden brown and the filling starts to bubble.
Cool Down
- Allow to rest on wire cooling rack for at least 2 hours.
Notes
Free Shipping on all orders $49+ at Peets.com