
Free Shipping on all orders $49+ at Peets.com
This gluten-free pie crust is made with all-purpose gluten-free flour. I’ve seen many recipes that use almond, coconut, and oat flour but this recipe is designed specifically for all-purpose gluten-free flour. I use King Arthur gluten-free flour but there are several other brands available.
A gluten-free pie crust is made using gluten-free flour blends, cold butter, and ice water to create a flaky texture without wheat flour. The best gluten-free pie crusts stay tender, hold their shape, and work well for fruit pies, cream pies, and savory pies.

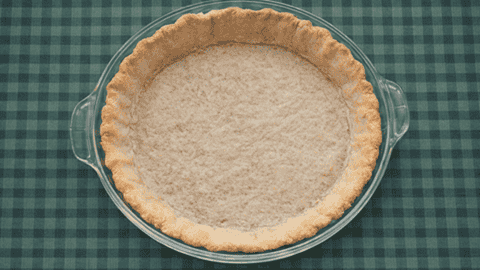
If you’ve made pie crust from scratch you know the most important ingredient is the butter. Be sure you choose a gluten-free brand of butter. I’ve seen recipes that recommend mixing the dough with an electric mixer. Seriously? The butter should be chunky. The chunks of butter are what make the crust flaky. If you can’t see chunks of butter in the dough when it’s in the pie plate, don’t expect the pie to have the expected flakiness. I read several reviews of recipes for gluten-free pie crusts and many mentioned that the crust came out like cardboard. I’m sure it did. The recipes recommended preparing the dough in a stand mixer!
This gluten-free pie crust has a flaky texture that is often difficult to achieve without flour containing gluten. The pie must be baked thoroughly: The golden-brown crust gives it a toasted flavor. This recipe is for two 9-inch gluten-free pie crusts, but you can adjust the serving size in the recipe card if you need only a single crust.
Gluten‑free pie crust is built on alternative flours that create a tender, flavorful base without relying on wheat, and that’s part of what makes it so appealing. Instead of traditional all‑purpose flour, it often uses blends of rice flour, tapioca starch, potato starch, or almond flour, each contributing its own texture and character. Because these flours don’t form gluten, the crust stays naturally delicate and crumbly, with a melt‑in‑your‑mouth quality that feels almost shortbread‑like. Butter (or a dairy‑free substitute) provides richness and helps bind the mixture, while a bit of sugar or salt rounds out the flavor. The result is a crust that tastes buttery and satisfying, not like a compromise.
Working with gluten‑free dough is different, but in a way that often makes the process easier. There’s no risk of overworking the dough, since gluten can’t develop, and cracks or breaks can be pressed back together without affecting the final texture. Many recipes use a slightly wetter dough or rely on parchment to help with rolling, but once baked, the crust turns crisp at the edges and tender underneath the filling. Whether used for fruit pies, cream pies, or custard‑based desserts, a gluten‑free crust delivers a delicious foundation that’s accessible to more bakers and eaters while still feeling homemade and indulgent.
Free Shipping on all orders $49+ at Peets.com
IMPORTANT NOTE: Be sure to check the butter and lemon juice for hidden gluten. We assume you’re using regular salted or unsalted butter. Some flavored butters have additives that contain gluten. Same advice on the sugar. If it is flavored, check the ingredients to make sure none of them contain gluten.
3 Easy Steps To Make Gluten-Free Pie Crust
- Mix
- Chill
- Roll
Mix The Dough
- Mix dry ingredients
- Add the butter, eggs, and lemon juice
- Blend the dough
- Cut into balls and refrigerate
Chill The Dough Balls
Refrigerate for at least an hour
Roll Out The Dough
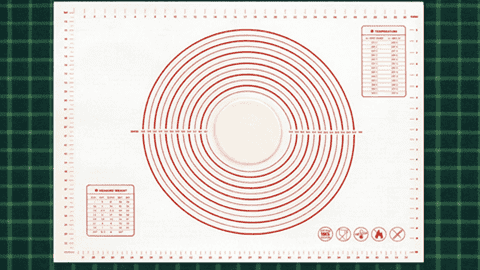
Be sure your rolling pin and surface where you’ll be rolling the dough are covered with gluten-free flour. I use a silicone rolling mat to make sure the dough is the correct size for the pie plate I’m using.
Frequently Asked Questions About Gluten-Free Pie Crust
What is the best flour for gluten-free pie crust?
Many bakers prefer a high-quality gluten-free flour blend that already contains xanthan gum. Popular options include Cup4Cup, King Arthur Gluten-Free Measure for Measure, and Bob’s Red Mill Gluten-Free 1-to-1 Baking Flour. Different blends can slightly change the texture, so experimenting can help you find your favorite.
Why does gluten-free pie crust crack when rolling it out?
Gluten-free dough is more delicate because it does not contain gluten for elasticity. If the dough feels dry or cracks easily, let it rest for a few minutes or add a small amount of cold water. Rolling the dough between sheets of parchment paper can also make it easier to handle.
Can I make gluten-free pie crust ahead of time?
Yes! Gluten-free pie crust dough can be prepared ahead and refrigerated for up to 2 days. You can also freeze the dough for longer storage. Wrap it tightly in plastic wrap and thaw it in the refrigerator before using.
Do I need xanthan gum in gluten-free pie crust?
Xanthan gum helps hold the dough together and improves texture. If your gluten-free flour blend already contains xanthan gum, you usually do not need to add extra. Always check the ingredient label before mixing your dough.
How do I keep gluten-free pie crust from getting soggy?
Blind baking the crust before adding wet fillings can help prevent a soggy bottom. Using a metal pie pan and baking the pie on a preheated baking sheet may also improve crispness and even browning.
Can I use this gluten-free pie crust for sweet and savory pies?
Absolutely. This gluten-free pie crust works well for fruit pies, cream pies, quiches, pot pies, and other savory recipes. You can slightly reduce the sugar for savory dishes if desired.
Is gluten-free pie crust harder to make than regular pie crust?
It can be a little more delicate to handle, but with the right flour blend and proper chilling time, gluten-free pie crust can be just as flaky and delicious as traditional pie crust.
Can I freeze a baked gluten-free pie crust?
Yes. After baking and cooling completely, wrap the crust tightly and freeze it for up to 2 months. Allow it to thaw at room temperature before filling and serving.
Why is my gluten-free pie crust tough instead of flaky?
Overmixing the dough or adding too much water can make the crust dense or tough. Using very cold butter and handling the dough gently helps create a flakier texture.
What pies work best with gluten-free pie crust?
Gluten-free pie crust is excellent for apple pie, pumpkin pie, pecan pie, chocolate cream pie, lemon meringue pie, and many other classic pie recipes.
What You’ll Need To Make Gluten-Free Pie Crust
Utensils & Equipment
- 9-inch deep dish pie plate
- Wire whisk
- Medium mixing bowl
- Rolling pin
- Pastry cutter
- Measuring cup
- Set of measuring spoons
- Plastic wrap
- Silicone pie crust rolling mat (not necessary but highly recommended)
- Pie shield (not necessary but highly recommended)
Key Ingredients
All-purpose gluten-free flour
- Granulated sugar
- Salt
- Xanthan gum
- Instant Clear Jel (some brands also spell this Clearjel and ClearJel
- Butter (preferably frozen)
- Large eggs
- Lemon juice
Gluten-Free Pie Crust Recipe
Utensils & Equipment
- 1 large bowl
- 1 pastry cutter or 2 forks
- 1 Rolling Pin
- plastic wrap
- 1 9-inch deep dish pie plate
- 1 measuring cup
- 1 set of measuring spoons
- 1 pie crust rolling mat (optional)
- 1 pie crust shield (optional)
Ingredients List
- 2 1/2 cups Gluten-free all purpose flour
- 4 Tbsp lemon juice
- 2 Tbsp granulated sugar (optional)
- 4 tsp Instant Clear Jel
- 1 tsp salt preferably fine grain
- 1 Tsp Xanthan gum
- 12 Tbsp Butter 1 1/2 sticks
- 2 Large eggs

Instructions
Most Important Step
- Freeze the butter and refrigerate the other ingredients for a minimum of 15 minutes. This is the most important step. All ingredients except the butter need to be as cold as possible.
Prepare The Butter
- The easiest method to prepare the butter is to cut it into cubes. Once done, be sure to freeze the butter for at least 10 minutes.
- Most stick butter has the measurements marked on the side of the package. Each stick is 8 tablespoons. I would cut 12 slices of one tablespoon each then cut each slice into four pieces.
Mix The Dry Ingredients
- As mentioned above, the dry ingredients should be refrigerated before you start to make the dough.
- In a large bowl whisk together the flour, salt, sugar, xanthan gum, and Clear Jel.
Mixing The Dough
- Add the butter to the dry ingredients. Blend together with a pastry cutter or fork. Do not use your hands or the heat from your hands will soften the butter.
- In a small bowl whisk together the eggs and lemon juice.
- Add the egg/lemon juice mixture to the dry ingredients one tablespoon at a time. Continue blending until you can see pea-sized chunks of the butter. DO NOT OVER BLEND,
- Stop mixing when the dough starts to hold together.
- If you believe the dough is too dry, add one tablespoon of cold water at a time until the mixture holds together.
Refrigerate The Dough
- Divide the dough into two flat disks and wrap in plastic.
- Refrigerate for at least 1 hour. This hardens the butter and allows the dough to rest.
Roll The Dough
- On a floured surface, roll the dough into circles roughly 12" round.
- A silicone rolling mat is particularly useful. A good mat has the dimensions of various crust sizes marked on the mat.
Refrigerate The Crusts
- Many bakers skip this step. After rolling the dough into circles, wrap separately in plastic wrap and refrigerate for at least an hour. If you're short on time, you can skip this step. Your crust will still be 100% better than the premade ones.
Ready, Set, Go!
- You should have two perfectly prepared pie crusts to being building your flaky showcase pie.
Important Baking Tips
The yolk in the egg may cause the edge of the crust to brown too quickly. You might need to use a pie crust shield or strips of aluminum foil, which is the cheapest option. Cut strips of aluminum foil about 2″ wide and fold them over the edge of the crust, all the way around.
If you’re making a single-crust pie, prebake the crust at 375℉ until golden brown. This could take anywhere from 15-25 minutes depending on your oven. If you notice any bubbles while baking, gently press them down with the back of a spoon.. Many old school bakers recommend using pie weights but the results can be unpredictable. I’ve never used pie weights and always baked a perfect crust.
Helpful Tools (optional)
If you bake a lot of pies, you might want to consider two of the most pie making tools. These are optional, of course. I’m big on conservation, mainly conserving time. It seems like the most tedious task in making pie crust is cleaning the flour off the counter where I rolled the crust. If I’m making a lattice crust pie, the crust shield saves the time it would otherwise take to tear off strips of aluminum foil and wrap them around the top crust.
Silicone Pie Crust Rolling Mat
Most silicone pie crust rolling mats are more useful than you might image. The best feature is the rings that should exactly what size you’ve rolled the dough. For a 9-inch deep dish glass pie plate I usually roll the dough until it’s about 11″ in diameter. The mat is also useful for stretching store-bought refrigerated pie crusts. Most refrigerated crusts claim they fit 9-inch pie plates but they’re a little short for the deep dish plates. When in doubt, roll it out!
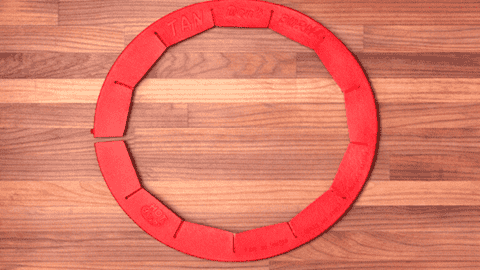
Silicone Pie Crust Shield
Most silicone pie crust shields are adjustable. They fit 9-inch pie plates perfectly. Simply place the shield around the crust to prevent the edge from browning too much while baking.
Free Shipping on all orders $49+ at Peets.com