
Free Shipping on all orders $49+ at Peets.com
Apple is by far my favorite pie but I also love a good pear. For years I wondered why no one makes pear pies. There are quite a few recipes for pear pies but based on the number of reviews I’m guessing not many people are a fan. Perhaps they just haven’t found the right recipe. Or, maybe they just don’t want to take the time to make a homemade pie.
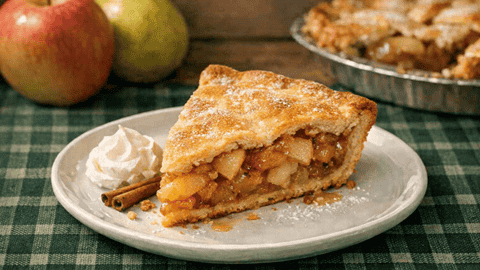
Over the years I’ve tried to make a pear pie several times but the filling always came out too juicy or the pears were too hard. It didn’t take long to realize it’s all about the pears. You must start with soft but not mushy pears. If the pears are as hard as a rock when the pie goes in the oven, they won’t magically soften while baking. Supermarkets hate it when customers squeeze the fruit but so far I haven’t been thrown out. You want pears that are slightly soft and give when squeezed. It’s the same principle most of use when buying peaches or plums. Soft but not mushy and not so hard that they’ll never soften while baking.
This recipe is not super easy. It does use refrigerated pie crusts to save time but it requires peeling, coring, and slicing the pears and apples. It also requires cooking the filling on the stove then waiting for it to cool before pouring it into the pie plate. Finally, you’ll need to freeze the assembled pie before baking. The end result is a super sweet, slightly juicy pie. I’m just warning everyone in advance that this is not a quicky and easy pie recipe.
Pear apple pie blends two fruits that complement each other beautifully. Apples bring structure, tartness, and a familiar autumn warmth, while pears add a softer, juicier sweetness that melts into the filling. Together, they create a layered flavor profile that feels both comforting and slightly unexpected. The mix of textures—firm apple slices against tender pear—keeps each bite interesting and gives the pie a naturally balanced richness without needing heavy spices or extra sugar.
It’s also a pie that feels seasonal and versatile, fitting just as well on a Thanksgiving table as it does at a casual weekend dinner. Bakers love it because it elevates the classic apple pie with minimal effort, offering something that tastes traditional yet subtly more refined. That combination of familiarity, gentle sweetness, and elegant simplicity is what keeps apple pear pie a favorite for many dessert lovers.

One thing I learned while testing this pie is that the apples matter almost as much as the pears. Softer apples tend to disappear into the filling and turn mushy, especially once mixed with juicy pears. A firmer apple like Honeycrisp, Granny Smith, or Pink Lady holds its shape much better and gives the pie a nice texture contrast. I also recommend slicing the fruit evenly so everything cooks at the same rate. Thick chunks of pear may stay too firm while thinner apple slices break down completely, so consistency really does make a difference here.
Free Shipping on all orders $49+ at Peets.com
Another important step is freezing the pie before baking, even if it sounds unnecessary. Chilling the assembled pie helps the crust hold its shape and slows down how quickly the butter melts once it hits the oven. That extra cold time also helps control some of the juice released from the pears and apples during baking. If you skip the freezer step, there’s a much better chance the filling will bubble over and leave you with a soggy bottom crust. It takes a little more patience, but the final texture and cleaner slices are worth the extra effort.
What You’ll Need To Make This Pie
Tools & Utensils
- 9-inch deep dish pie plate
- Wire cooling rack
- Large bowl
- Spatula or spoon
- Large saucepan
- Measuring cup
- Set of measuring spoons
Key Ingredients
- Apples
- Pears
- Light brown sugar
- All-purpose flour
- Ground cinnamon
- Ground ginger
- Salt
- Vanilla extract
- Lemon juice
- Butter
Classic Pear Apple Pie Recipe
Utensils & Equipment
- 1 9-inch deep dish pie plate
- 1 wire cooling rack
- 1 large bowl
- 1 spatula or spoon
- 1 large saucepan
- 1 measuring cup
- 1 set of measuring spoons
Ingredients List
- 4 apples peeled, cored, and sliced
- 4 pears peeled, cored, and sliced
- 3/4 cup light brown sugar
- 4 Tbsp all-purpose flour
- 1 Tbsp ground cinnamon
- 1/2 tsp ground ginger
- 1/4 tsp table salt
- 2 tsp vanilla extract
- 1 Tbsp lemon juice
- 4 Tbsp butter cold

Instructions
Prepare The Fruit
- Peel, core, and slice the apples and pears.
Prepare The Filling
- In large bowl whisk together the flour, sugar, cinnamon, ginger, and salt.
- Toss the apples and pears in the sugar mixture then stir in the vanilla extract and lemon juice.
- In a large saucepan melt the butter on medium-high heat.
- Add the fruit mixture and cook, stirring regularly, until the fruit has softened and the juice starts to thicken. This could take up to 20 minutes.
- Remove the filling from the heat and cool completely.
Assemble The Pie
- Refrigerated pie crusts should sit at room temperature for 15-20 minutes or as directed on the package.
- Place the bottom crust in the pie plate once it has sufficiently softened at room temperature.
- When the filling is cool, spoon into the bottom crust.
- Add the top crust and flute the edge to create a scalloped look or press the two crusts together with a fork.
- Cut 4-6 slits in the top crust to allow the filling to vent while baking.
- Freeze the pie for 20 minutes or until it is solid.
Preheat Oven
- While the pie is in the freezer, preheat the oven to 425°F.
- Place a sheet of aluminum foil on the bottom rack to catch any juice that drips from the pie while baking.
Bake
- Bake the pie at 425℉ for 15 minutes, then reduce the oven temp to 375°F.
- Bake for an additional 50 to 60 minutes or until the crust is golden brown and the filling is bubbly.
- Pie is done ONLY when you see the filling bubbling through the top crust.
Cool
- Allow to sit on wire cooling rack for at least 3 hours.
Free Shipping on all orders $49+ at Peets.com