
Free Shipping on all orders $49+ at Peets.com
As a former chef I have more tools, utensils, and equipment than most people would believe. Yes, I have a meat slicer and a hamburger grinder. Let’s not get into all the deep fryers and electric skillets. As a lifelong Yankee I even have 3 different size pressure canners. It seems like the more pies I made, the more cool tools I accumulate. While I’m preparing a pie my mind is constantly thinking of other tools that would speed up the process.
When it comes to making pies, I use very few tools. I’m not big on using electric appliances like a food processor or blender for pies. I do everything possible by hand. Being from New England I’ve made countless apple, pumpkin, and blueberry pies. All of the ingredients came straight from the farm or orchard. It seems like no matter what type of pie I’m making, I always reach for the same tools.

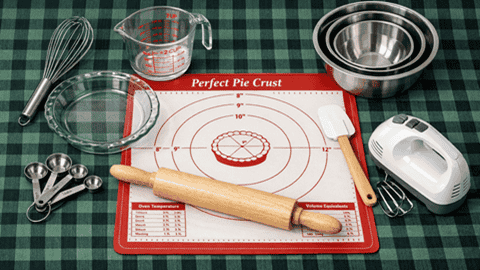
Below you’ll notice there are 12 items listed but I’m not counting the pie plate or wire cooling rack as a tool. Tools are the instruments you use to prepare a pie. The pie plate is the vessel in which you bake (or not bake) it. The cooling rack is used after the fact. I consider tools to be the ones you use to magically transform the ingredients into a perfectly prepared pie.
Essential Tools For Making Pies
- 9-inch deep dish pie plate
- Measuring cup
- Measuring spoons
- Mixing bowls
- Pastry Cutter
- Pastry roller
- Rolling mat
- Rolling pin
- Spatulas
- Spoons
- Wire cooling rack
- Wire whisks
Measuring Cup
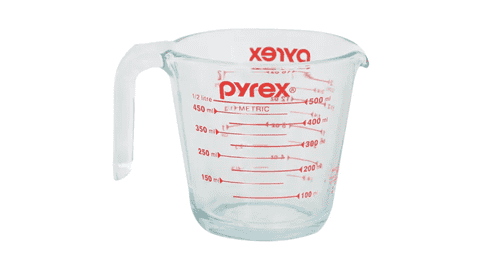
A graduated measuring cup is probably the most essential tool for making pies. I prefer a glass measuring cup. There are also stackable measuring cups that comes in plastic and stainless steel. I have enough utensils in my drawers without needing to dig through 5 drawers searching for that 1/4 cup measuring cup. I prefer a graduated one that holds up to 2 cups. It’s the easiest and fastest way to accurately measure the many ingredients needed to assemble those somewhat complicated pie recipes.
Check my Amazon store for the best prices on measuring cups.
Measuring Spoons
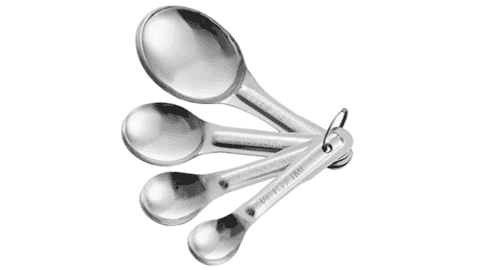
Nearly every recipe requires tablespoonfuls of this or teaspoonfuls of that. If you’re measuring dry ingredients you don’t need to wipe out the measuring spoon after each use. I usually measure the dry ingredients first then the liquid ingredients, wiping out the spoon after each liquid to ensure that the pie receives the full amount recommended in the recipe.
Free Shipping on all orders $49+ at Peets.com
As a word of caution, don’t buy plastic measuring spoons. Sure they cost less than stainless steels measuring spoons but they won’t last as long. Plastic absorbs liquids, especially grease and fat. No matter how many times you clean plastic, you can never really be sure you’ve removed every trace of the last ingredient. If you place a dry ingredient like flour in a plastic measuring spoon and some it sticks to the spoon after you empty it, chances are the spoon wasn’t clear to begin with.
Check my Amazon store for the best prices on measuring spoons.
Mixing Bowls
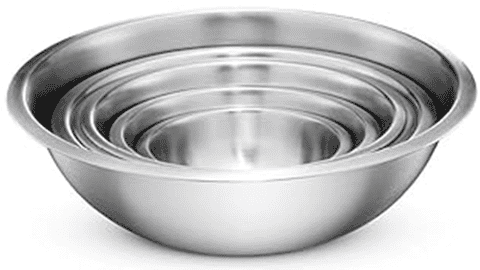
You should have at least 3 different size mixing bowls- small, medium, and large. I use the smallest bowl whenever a recipe includes dry or liquid ingredients that should be blended together. Often times I’ll notice the recipe recommends just dumping ingredients into a bowl and mixing them up. I always mix the dry ingredients separately, like granulated sugar and cinnamon. Add that to the flour then mix the liquid ingredients separately and gradually blend them into the dry mix.
You may notice that there are two types of stainless steel mixing bowls. Most are round at the bottom. They work perfectly when using a wire whisk or electric mixer. The other type of bowls have sides that are more straight. There’s always an area where the side meets the bottom that’s nearly impossible to reach with a whisk or electric mixer. Try to find bowls that are perfectly round to help ensure that all of the ingredients in the bowl are thoroughly blended together.
Check my Amazon store for the best prices on mixing bowls.
Pastry Cutter
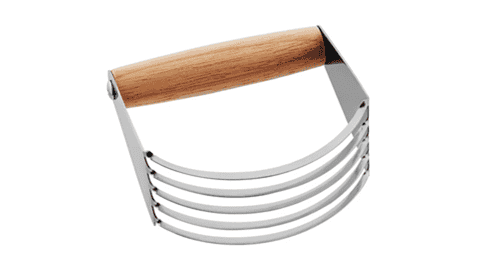
A good pastry cutter is essential to making the perfect pie crust. It is also referred to as a pastry blender. Creating a super flaky pie crust requires cold butter, preferably frozen. The pastry cutter allows you to incorporate the butter into the flour without using your hands or trying to juggle using two forks like some recipes recommend.
Many pastry cutters have a wooden handle while the cheaper ones usually have a plastic handle. It really doesn’t matter which type you use as long as it’s squeaky clean before using. I’ve noticed that wooden utensils tend to dry out after repeated washing in a dishwasher so I usually just wash mine by hand.
Check my Amazon store for the best prices on pastry cutters.
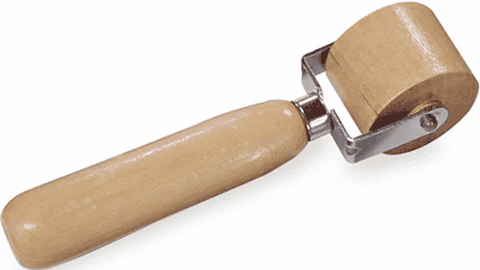
Pastry Roller
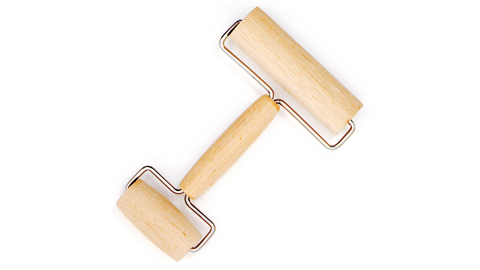
A pastry roller comes in handy if you make a lot of homemade pie crusts. The most common tool has two different size rollers. The largest roller is perfect for rolling dough. Sometimes it seems like a rolling pin has a mind of its own. I find smaller rollers are easier to work with.
If you make a lot of graham cracker or crushed cookie crusts, you might find a pastry roller is much easier to use and works better than a measuring cup or spoon. Those are the tools typically recommended in graham cracker crust recipes. The pastry roller I use is shown below. To learn more about it, check out my Super Easy Graham Cracker Pie Crust Recipe.
Check my Amazon store for the best prices on pastry rollers.
Rolling Mat
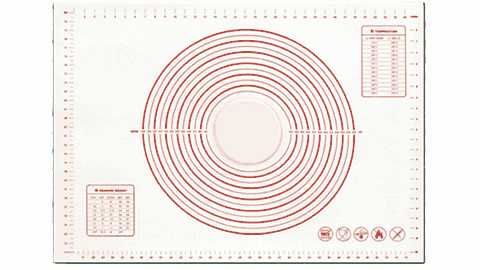
I’m not sure why more pie recipes don’t mention using a rolling mat. They are designed specifically for rolling out different sizes of pie crusts. For me the most time-consuming step of preparing a pie is cleaning the counters and various tools I used during the many steps it took to get that pie in the oven. The last thing I want is to have to clean flour off the counter (or the floor) and wash a cutting board.
A silicone rolling mat makes cleanup a breeze. Wipe the excess flour in the trash and wash off the mat. It has different size circles clearly marked so you can aim for for whichever size of pie crust you’re making. Nothing could be easier than rolling the dough until you achieve the desired size.
Check my Amazon store for the best prices on pie crust rolling mats.
Rolling Pin

A rolling pin is probably the most common tool in a pie baker’s kitchen. Most are unnecessarily large for rolling out a pie crust but there are smaller sizes available. I’ve gone through 4 rolling pins over the years. These workhorses hardly ever break but sooner or later the grease from the butter starts to collect, and it seems like there’s just no way of getting it clean.
In addition to wood, rolling pins are also available in plastic, stainless steel, aluminum, silicone, and even marble. I once picked up a marble rolling pin in a store and immediately put it back on the shelf. It was way too heavy to imagine trying to crank out 24 crusts when I was on a pie baking spree. Of course the plastic rolling pins cost the least but won’t last anywhere near as long the stainless steel, aluminum, or wooden ones.
Check my Amazon store for the best prices on rolling pins.
Spatulas
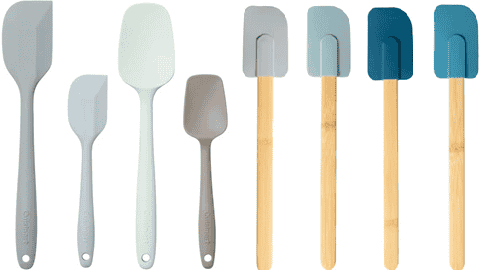
If you have less than 3 spatulas in your kitchen, it’s time to step up and join the home bakers club. My sister-in-law is constantly cooking and baking. Last time I asked she had over 20 spatulas of different sizes and shapes. If you take your pies seriously, don’t buy spatulas at the dollar store. They are entirely plastic, including the blade, and will break after only a few uses.
It might just be my experience but it seems like two-piece spatulas with a wooden handle never last. The blades are usually silicone or hard plastic. The head ends up cracking right where it’s attached to the handle. In my kitchen the spatulas with the wooden handles shown in the image above wouldn’t last 3 months without breaking. As much as I love wood products, it just seems like the spatulas never last. Maybe I make too many pies.
Check my Amazon store for the best prices on a set of spatulas.
Spoons
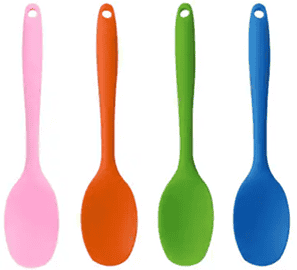
My wife rolls her eyes every time I say we can never have enough spoons. If I were to sort through all of the utensils in our kitchen drawers and reorganize them by type, at least one entire drawer would be spoons. It’s nearly impossible for me to walk through a store housewares section without picking up another set of spoons, that are probably the same exact ones that I already have.
Spoons are similar to spatulas in that some are two-piece and have a wood handle. They won’t last any longer than the spatulas with wood handles will. One-piece spoons last the longest and are the easiest to clean. I prefer the spoons that are silicone or the ones that feel like rubber. Manufacturers aren’t required to list the materials used in their products so you never really know what spoons are made of. I prefer soft, flexible spoons that feel rubbery.
Check my Amazon store for the best prices on a set of spoons.
Wire Whisks
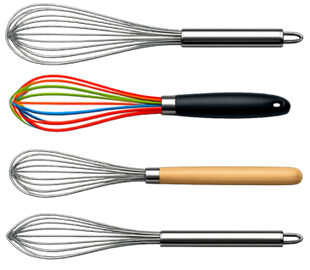
The more you rely on whisks to get the heavy mixing done, the more you’ll realize not all whisks are the same. One whisk might have 8 wires and another have 16. One has the wires glued into the handle and another has wires that are welded into place. To me it seems like the more whisks you use, the more you’ll want.
The most noticeable difference with whisks is the tip where there wires come together. You want a whisk with wires that form a nice round end. When you’re digging into a bowl to bring the ingredients together, you want all of the wires coming in contact with the entire bowl. Notice the tip of the whisk shown at the bottom of the image above. It has a pointed tip! You can whisk all day and never get the ingredients thoroughly mixed in a round bowl because most of the wires aren’t reaching to the bottom or sides of the bowl.
You’ll find whisks that are made of silicone and ones that have wires coated in silicone. I’ve never had any luck with those. A whisk needs to be stiff. The silicone whisks are flexible and nowhere close to being stiff. The whisks with silicone-coated wires seem to work decent. I haven’t yet had one break but I suspect sooner or later the silicone is going to crack and fall off one or more of the wires.
When buying a whisk it’s important to look at the number of wires. Some whisks have only a few wires and others have a lot. The more wires on the whisk, the more difficult it will be to mix or blend some ingredients. Let’s say you’re blending molasses into flour. If the whisk has too many wires the mixture will clump together and you’ll end up having to clean the whisk over and over again. If you’re making a softer filling like custard or pudding, a whisk with more wires will get the job done faster than a whisk with less wires.
Check my Amazon store for the best prices on wire whisks.
Other Helpful Utensils & Equipment
- Baking sheets
- Hand tools & utensils
- Papers, foils, and wraps
- Wire Cooling Rack
Baking Sheets / Cookie Sheets
Check my Amazon store for the best prices on baking sheets.
Hand Tools & Utensils
- Apple Corer
- Apple Peeler
- Apple Slicer
- Vegetable Peeler
Check my Amazon store for the best prices on hand tools & utensils.
Paper, Foils and Wraps
- Aluminum foil
- Parchment paper
- Plastic wrap
- Wax paper
Check my Amazon store for the best prices on baking essentials.
Wire Cooling Rack
Check my Amazon store for the best prices on wire whisks.
Free Shipping on all orders $49+ at Peets.com