I’m an avid home canner. In an average year I can 60 quarts of tomato sauce, 100+ quarts of pickles, 60-80 quarts of blueberries including blueberry pie filling, 30+ quarts of applesauce, and 50 quarts of apple pie filling. I have 3 different pressure canners that hold up to 64-ounce jars. When I searched for how to can apple pie filling, I was appalled by some of the “quick and easy” recommended techniques. While you can make your own canned apple filling without a pressure canner, you shouldn’t cut corners or the apple pie filling will lack quality, texture, and flavor.
The secret to canning apple pie filling isn’t how you boil the jars. The most important step is adding the right ingredients to the filling before it goes into the jars. Boiling the jars is simply to raise the temperature of the filling to kill any bacteria or other nasties that might cause it to spoil. The spices should be in the filling before you can it.
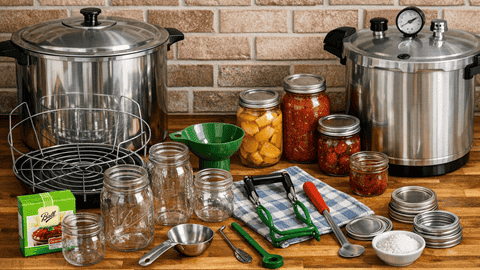
Canning Equipment You Should Have
- Canning jars – anywhere from 8 to 64 ounce
- Jar lids with seals – you can reuse lids but the seals must be new
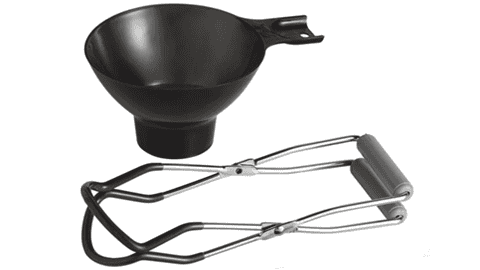
- Canning tongs, which are technically called a canning jar lifter
- Canning funnel
- Large stockpot or pressure canner
If you’re good with a spoon and have a steady hand you might be able to do without the canning funnel but don’t overlook the importance of the tongs. Mine have rubber grips that grab the jars securely. They fit all jars from 8 to 64 ounces. If you use metal tongs, you run the risk of having the jar slide out of the tongs. When the jars are done boiling you’ll need to lift them out of the boiling water. The tongs are the perfect tool to avoid scalding your fingers.
Technically you don’t need to use a pressure canner because apples are fruit. Normally the only items you’d need to process in a pressure canner are ones that have low acidity, like vegetables and pasta sauce. You can use the water bath method to process the apple pie filling but the pot must be large. It must be big enough to cover the tops of the canning jars with at least one inch of water.
What size canning jars you use depends on the quantity of pie filling you’re making and what you intend to use it for. An average pie takes about 2 quarts of filling. If you want to use the filling for dessert toppings or in your homemade muffins, you might want to go with the 8-ounce canning jars. I think the easiest jars to handle are the 16-ounce wide mouth jars. Even a medium pot will hold four of the 16-ounce jars as long as it’s tall enough.
Utensils & Equipment You’ll Need
Canning equipment as mentioned above
Large pot (used for the canning water bath)
Medium pot (to cook the apples)
Spoon or spatula
Measuring cup
Set of measuring spoons
Thickening The Apple Pie Filling
In baked apple pies we normally use cornstarch or flour to thicken the filling. According to the FDA, neither cornstarch nor flour is “safe” to use when canning. Most home canners disagree with this but it is what it is. You can either include the cornstarch or flour as mentioned in the recipe or use Clear Gel. Clear Gel is the only product recommended by the FDA as a thickener when canning.
IMPORTANT NOTE: Clear Gel is not the same as Sure-Jell. Clear Gel is a modified cornstarch used to thicken pie fillings, gravies, and sauces. Sure-Jell is a fruit pectin product used for thickening jellies and jams. Do not use Sure-Jell in this recipe.
My preference for thickening the filling would be to add nothing. If you’re going to later use the filling to make an apple pie, you can add cornstarch or flour at that time.
Using The Apple Filling To Make an Apple Pie
When you’re ready to use your homemade apple filling to make a pie, there are few key techniques to remember. Do not use a prebaked crust and be sure to strain the apples. The filling should go into a new crust that hasn’t been baked. If you use a prebaked crust it will burn.
The apple pie filling should be strained to remove most of the water. This is when I add the thickening agent. My preferred ingredient is flour but you can use an equivalent amount of cornstarch or Clear Gel. In a medium bowl mix the strained apple filling, 1/4 cup of flour, and 1 teaspoon of apple pie spice. Mix thoroughly and spoon into the bottom crust. Add the top crust and bake at 400℉ for 40-45 minutes or until the top crust is golden brown and the filling begins to bubble.
Key Ingredients For Canned Apple Pie Filling
- Fresh apples (peeled, cored, and sliced)
- Clear Gel (optional)
- Granulated Sugar
- Light Brown Sugar
- Lemon Juice
- Apple Pie Spice (learn how to make your own apple pie spice)
4 Easy Steps To Canning Apple Pie Filling
- Start boiling the water
- Clean the canning jars, seals, and lids
- Make the filling
- Fill and boil the jars
Start Boiling The Water
Bringing the water to a boil might take an hour. The larger the pot, the longer it will take for the water to come to a rolling boil. Determining how much water to put in the pot is a challenge. Remember, the water level will rise each time you add another jar to boil. You can always remove some of the water if the level is too high. As a general rule of thumb, place the largest canning jar in the bottom of the empty pot and fill the water almost to the top of the jar. Remove the empty jar after you’ve filled the water.
Once you have the water in the pot, heat on medium-high and wait forever to it boil. They claim a watched pot never boils. When I fill my largest pressure canner, it seems like it takes 2 days to boil.
Clean The Canning Jars, Seals, and Lids
If your canning jars are brand new you might not think they need to be cleaned but this step is critical to ensure that any residue and unforeseen germs or bacteria are eliminated before filling the jars.
Once the water in your pot starts to boil, dip the canning jars in the water to sterilize. I’ve seen recommendations that you also sterilize the seals but no one I know does it. If you want to be super safe, dip the seals and rings in the boiling water. Place the clean jars upside down on a cooling mat or clean towel.
Finally the fun part! Let’s make the apple pie filling!
Make The Filling
Step 1 – In large pot add 1/4 cup of lemon juice and 3 cups of water.
Step 2 – Peel, core, and slice the apples. Peeled apples turn brown when exposed to air. Lemon juice prevents the slices from turning brown. After you peel, core, and slice each apple, immediately place the slices in the pot to prevent them from turning brown.
Step 3 – Add the sugars and apple pie spice to the apples and cook on medium heat. If you’re adding the Clear Gel, add that now. Keep stirring the apples to prevent burning and to thoroughly mix the spices. Cook until the apples start to soften and the mixture starts to thicken, which normally takes only a few minutes.
Fill and Boil The Jars
I use a canning funnel for everything. I’m a klutz and would end up with apple filling all over the kitchen if I tried to fill the jars by hand. A canning funnel and jar lifter are my lifelines when canning.
Once the filling is ready, fill the jars to the BOTTOM of the neck. Do not fill any higher or the jars might explode when boiling in the water bath. Some recipes recommend jamming the apples into the jars. I prefer to cut some of the apple slices into smaller sections to help tightly pack the jars. Once all of the jars are packed with apples, use some of the water/lemon juice to fill the jars to the BOTTOM of the jar neck.
Wipe the rims of the jars with a clean towel, apply the seals, and screw on the lids as tightly as possible. Use a jar lifter to carefully lower the jars into the boiling water. Make sure the water level is at least one inch above the tops of the jars. Once all of the jars are in the canning pot, allow the water to come to a rolling boil. Cover the pot and boil for 25-30 minutes. When done, use the jar lifter to move the jars from the pot to a cooling mat or clean towel.
Make Your Own Canned Apple Pie Filling
Utensils & Equipment
- 2 quart canning jars or 4 pint size jars
- 2 canning jar ring lids or 4 if you're using pint size jars
- 2 canning jar lid seals
- 1 large pot to be used as a water bath
- 1 medium pot
- 1 canning funnel
- `1 canning jar lifter
- 1 spoon or spatula
- 1 measuring cup
- 1 set of measuring spoons
Ingredients List
- 3 pounds fresh apples
- 6 Tbsp flour or cornstarch (optional)
- Clear Gel (optional)
- 1 cup granulated sugar
- 1/2 cup light brown sugar
- 2 tsp apple pie spice
- 3 cups water
- 1-2 cup lemon juice
Instructions
Start The Water
- Fill large pot halfway full of water. This will be used as the water bath. Large pots will take quite a while to boil.
Sterilize The Jars, Lids, and Seals
- Once the water in the canning pot starts to boil, dunk the jars in the boiling water and place upside down to drain,
- Sterilize the canning lids (rings) and seals in the boiling water and place them aside for now.
Set Up The Cook Pot
- In medium pot add 1/4 cup of lemon juice and 3 cups of water.
Prepare The Apples
- Peel, core, and slice the apples. Cut some of the slices into smaller pieces to better fill the jars.
- As each apple is sliced, drop the pieces into the pot with the water and lemon juice. This will prevent the slices from turning brown when exposed to air.
Cook The Apples
- Read section above about thickening the apple pie filling. You can use flour, cornstarch, or Clear Gel. The best option is to omit the thickening agent and add it when using the filling to make a pie.
- Add sugars and apple pie spice to the apple mixture and mix thoroughly.
- Cook on medium heat, stirring frequently, until the apples start to soften and the mixture starts to thicken. This should take only a few minutes depending on the firmness of the apples you chose.
- Remove from heat.
Fill The Jars
- A canning funnel works best for filling the jars.
- Spoon the apple mixture into the jars. Fill ONLY to the bottom of the jar neck. Do not fill any higher or the jar may explode in the water bath.
Seal The Jars
- Wipe the rims of the jars to make sure they're clean then apply the jar seal and the ring. Seal as tightly as possible.
Bath Time
- Using a jar lifter, place the canning jars in the water bath, ensuring that the water is at least one inch above the lids.
- Allow the water to come back to a rolling boil, cover the pot, and boil for 25-30 minutes.
Cooling Time
- Using a jar lifter, remove the jars from the water bath and place on a cooling mat or clean towel.
- Allow jars to sit at room temperature for 24 hours.
- As the jars to start to cool you should hear a popping sound. That's the button in the middle of the lid being sucked in as the filling cools, which means the jar is SEALED.
Safety Tip
- Make sure the jars are properly sealed. The button in the center of the lid should be down. If the button makes a popping sound when you push it, the jar is not sealed. To properly seal the jar you'll need to replace the seal and then boil the jar again.