As preparation for this article I checked over 100 different recipes from the websites of 17 different bakers. Not surprisingly, 65 of them recommended using a store-bought refrigerated pie crust. Quick and easy recipes seem to be today’s trend, and there’s no way to quickly prepare a pie if you’re going to make the crust from scratch.
There are other options in addition to using a refrigerated pie crust. There are frozen pie crusts as well as mixes that allow you to whip up a fresh crust. I checked out the directions for one of the national brand pie crust mixes. It had directions for both a traditional rolled crust as well as a no-roll version. Neither version is really quick and easy. You still have to do a lot more work than just opening a refrigerated crust and dropping it into the pie plate.
Most Important Step In Using Refrigerated Pie Crust
There really aren’t any secrets about refrigerated pie crusts but there is one major instruction that most people overlook. This is why I must emphasize that you should READ THE INSTRUCTIONS ON THE PACKAGING. The crusts should sit at room temperature for 15-20 minutes. This is to allow the fat (usually butter) in the dough to soften. Pillsbury claims its refrigerated crusts can also be microwaved on the defrost cycle for 10-20 seconds. Whichever method you use, it’s imperative that the crusts be brought up to room temperature before using.
Another overlooked fact is that you can make the crust slightly larger. Most refrigerated crusts are made for 9″ pie plates but most serious bakers use deep dish pie plates. Even though the plates are both 9″ wide, the deep dish requires a larger crust. To make the crust bigger, simply roll it out.
Making The Crust Larger
Some bakers love flour to the point that they overlook other options. There’s no need to cover your counter with flour in order to roll the refrigerated crust. Roll it between two sheets of waxed paper. It takes 15-20 seconds to roll the dough and two seconds to dispose of the waxed paper. This little trick will reduce the time required to roll the dough to practically nothing.
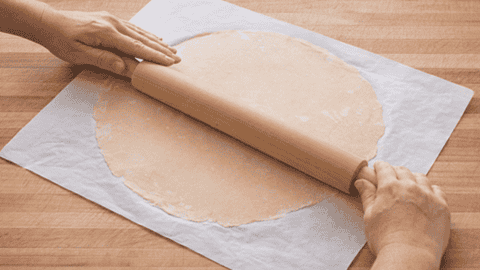
Before rolling the crust, make sure it is at room temperature. Straight out of the fridge it will be stiff and might crack. Allowing the fats in the dough to soften makes it easier for the dough to stretch. For deep dish pie plates you should only need to increase the crust by 1/2″ or so. When in doubt, roll the dough and try fitting it in the pie plate. If it’s not quite big enough, roll it a little more.
Making a Single Crust Pie
Prepare The Crust
- Place the crust in the pie plate. Firmly press it into the bottom and up the sides.
- Use a fork to prick holes in the bottom and sides of the crust. This is to prevent the crust from creating bubbles while baking.
- Check the crust every few minutes. If you notice any bubbles forming, prick them with a fork.
- Some old school bakers recommend using pie weights when baking a single crust. You can use them if you want but I never do. I’ve read countless opinions of bakers who tried pie weights and they’re not good. The results range from dimples in the crust left by the weights to the crust being under cooked due to the presence of the weights.
Crimp The Edge (Optional)
The easiest method of preparing the edge of the crust is to fold any excess underneath itself. This creates almost a double crust so the edge crust is easier to cut. For the longest time I used a method I found in a recipe. It recommended simply trimming off the excess crust around the edge of the pie plate. In reality, by not folding the excess crust underneath, the crust near the rim was extremely thin.
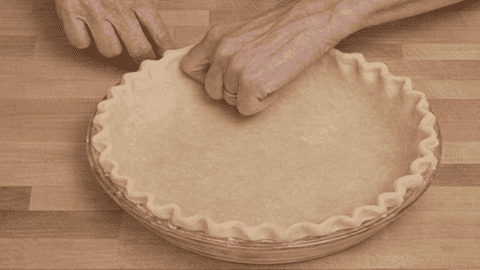
If you enlarged the crust as mentioned above, you should have enough to create a scalloped edge. Simply use both hands and push the excess crust between your fingers. In the example below, you’d be using your left index finger to push the crust between the fingers of your right hand.
Baking The Crust
If you’re making a pie that doesn’t require baking, such as a cream pie or cheesecake, you’ll want to bake the crust first then let it sufficiently cool before using. Pillsbury recommends baking the crust for 10-12 minutes at 425℉. This is when you really need to know your oven. My oven has a new heating element and always bakes faster than recipes claim it should take. If you have a new oven (or heating element), start checking the crust before 10 minutes. My step-daughter sets a timer immediately after placing anything in the oven. 99 times out of 100, when the timer goes off the food is on the verge of being burnt
Once the crust is baked, allow to cool at room temperature for at least 30 minutes. I usually place the pie plate on a wire cooling rack to ensure that the bottom can sufficiently cool. If you need the crust sooner, allow it to cool in the refrigerator for at least 10 minutes. DO NOT put the hot crust in the freezer. As the crust cools condensation will form that makes the crust soggy.