
Free Shipping on all orders $49+ at Peets.com
Lattice pie crust can be made with homemade crust and refrigerated pie crust. This simple method is often complicated by terms with which you’ve not familiar such as “weaving lattice crust.” Weaving just sounds too complicated, which is why many bakers shy away from attempting to make this super easy crust. Done the easy way there is no weaving. You simply fold the lattice strips up or down to place the next strip.
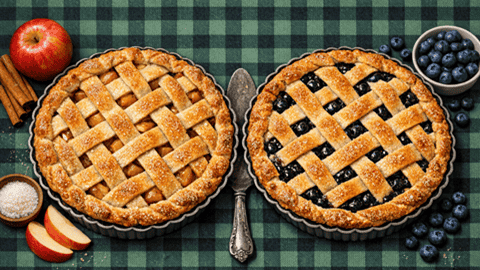
Our website contains only pie recipes. Pies are my favorite dessert, and this is my website so pies it is! Most pies are fun to make and come out of the oven in less than hour. I’m not a big fan of lattice crusts but some people are so I decided to share the pros and cons of topping that luscious pie with a flaky lattice crust. In an average year I make about 100 pies, mostly apple, pumpkin, blueberry, and banana cream. Out of 100 pies I might do 10 with a lattice crust.

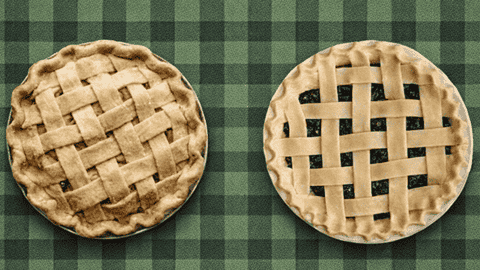
The first decision you’ll have to make when considering a lattice crust is how many strips you want to use. There are no set number of strips. Some bakers use wide strips that cover the entire pie. Others use narrow strips that expose much of the filling inside. This is entirely up to you. Below are two examples so you can see what we mean. The most common choice is to use 10 strips.
What You’ll Need
Making lattice pie crust requires only a few tools. You’ll need some type of cutter. I prefer a knife but you can use a pizza cutter or one of the fancier tools mentioned below in the Lattice Pie Crust Cutters section. You’ll also need a small bowl of water and a brush. If you want to create a darker crust and add sugar, you’ll also need another small bowl, brush, melted butter, and granulated sugar.
- 2 small bowls
- Brush
- Water
- Melted butter
- Granulated sugar
3 Simple Steps To Creating The Perfect Lattice Crust
At this point I assume you’ve already assembled your pie and it’s ready to go. This is optional but a step that most home bakers swear is necessary. Fill a small bowl with water and brush it along the edge of the bottom crust. This will help secure the lattice strips to the bottom crust. Just brush water along the outer edge of the bottom crust. With that out of the way, let’s move onto making the lattice top crust.
Cut The Lattice Strips
See the section below on Lattice Pie Crust cutters. Being a former chef I’m most at home with a chef’s knife in my hand so I usually cut the strips by hand. The easiest method is to use a regular pizza cutter. I’ve seen pie recipes that show using a ruler to cut the strips straight. Unless you’re 100% positive your ruler is clean and sterile, don’t use it.
Free Shipping on all orders $49+ at Peets.com
After looking at dozens of lattice top pie recipes, I believe 10 strips is the most common. In the image above ,this would be the pie on the right. There are 5 horizontal strips and 5 vertical strips. This leaves just enough space to see that yummy filling between the lattice strips.
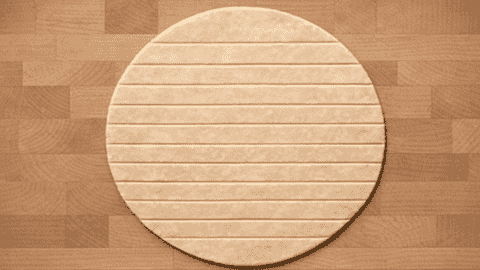
You’ll notice in the example above that there are 10 strips cut but a total of 12 pieces of dough. Seldom does anyone use the rounded strips at the top or bottom. You’re welcome to use them if you’d like but you might find that placing strips too close to the edge of the pie makes the crust crumble when cutting it into slices.
Create The Lattice Top
This is going to sound slightly complicated but I’m including a super cool video below. Place 5 strips across the pie vertically, from left to right as shown below. We’re going to call these strips 1, 2, 3, 4, and 5.
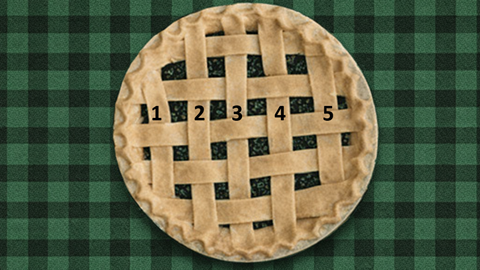
Now we’ll place the horizontal strips, Fold down the top ends of strips 2 and 4 then place the top horizontal strip. When done, fold strips 2 and 4 back into place.
Next we’ll unfold strips 1, 3, and 5 by folding them up. Place the second horizontal strip under the first one and fold strips 1, 3, and 5 back into place.
For the third horizontal strip we’ll fold up strips 2 and 4 to place the horizontal strip.
For the fourth horizontal strip we’ll fold up strips 1, 3, and 5.
For the bottom horizontal strip we’ll fold up strips 2 and 4.
That’s it!
If you’re a visual person, you can watch this video from King Arthur Baking on How To Weave a Lattice Pie Crust. This is by far the best video available that shows in perfect detail how to place 10 lattice strips.
Video – How To Weave a Lattice Pie Crust
Seal The Edges
If you watched the above video you already know how to seal the edges of the crust. First cut off any excess from the strips that might be hanging over the edge of the bottom crust. You can then either pinch the lattice strips into the bottom crust or use your fingers to create a scalloped edge. This is shown in the video.
For all practical purposes your pie is ready for the oven but there is one additional steps that’s entirely optional. If you want a darker or sweeter top crust you can brush melted butter on the crust and sprinkle with granulated sugar. In a small bowl melt a couple tablespoons of butter and brush it on the entire top crust, including the lattice strips. Then sprinkle granulated sugar over the butter.
I know bakers who always add the butter and sugar. I personally don’t do this because I love the flavor of apples and don’t need extra sugar in my diet. You’ll find countless tips on how to prevent the top crust from becoming too dark. These tips range from covering the outer crust with strips of aluminum foil to using a pie crust guard.
That’s it. Your crust is done and the pie is ready for the oven!
Lattice Pie Crust Cutters
The most common tools used to cut lattice strips are a knife or a pizza cutter. You might run across a recipe that recommends using a lattice pie crust crimper. It looks like a pizza wheel but has indents to create a fancy edge on the lattice strips. I personally have 6 drawers full of kitchen utensils and don’t have room for another one.
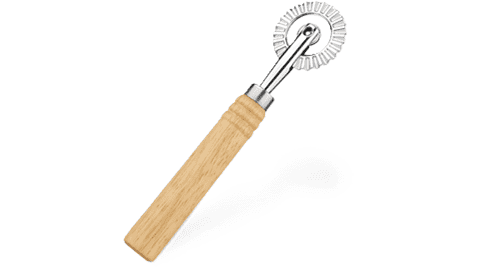
Other options are available for cutting lattice crust. Some create fancy designs so you don’t need to cut the strips. If you want to do something super fancy, just search online for “lattice pie crust cutter” and you’ll be amazed at how many different designs there are. Most look like oversize cookie cutters that cut the entire top crust in one piece so it eliminates cutting and weaving the lattice strips.
Common Lattice Pie Crust Mistakes
Cutting Uneven Dough Strips
Uneven strips can make the lattice pattern look crooked and may cause some areas to bake faster than others. Use a ruler or pastry wheel to keep the strips the same width for a cleaner, more professional-looking pie crust.
Working With Dough That Is Too Warm
Warm pie dough becomes sticky and difficult to weave. If your strips start stretching or tearing, place them in the refrigerator for 10 to 15 minutes before continuing with the lattice pattern.
Pulling the Dough Too Tight
Stretching the lattice strips too tightly can cause the crust to shrink while baking. Lay the strips gently across the pie filling without pulling so the crust keeps its shape in the oven.
Forgetting to Chill the Pie Before Baking
Chilling the assembled pie helps the butter stay cold, which creates a flakier crust and helps the lattice hold its woven appearance during baking.
Skipping the Egg Wash
An egg wash gives the lattice crust a shiny golden-brown finish. Without it, the crust may look pale and dry after baking.
Overfilling the Pie
Too much filling can bubble over the edges and make the lattice soggy. Leave a little space between the filling and the top of the pie plate to prevent messy spills during baking.
Not Sealing the Crust Edges
Failing to press the lattice strips into the bottom crust can cause the edges to lift apart while baking. Gently crimp or press the edges together before placing the pie in the oven.
Frequently Asked Questions
How wide should lattice pie crust strips be?
Most lattice strips are cut between 1/2 inch and 1 inch wide. Wider strips create a classic rustic look, while thinner strips produce a more detailed woven design.
Do you need to chill lattice pie crust before baking?
Yes. Chilling the assembled pie for about 15 to 20 minutes before baking helps the crust hold its shape and improves flakiness.
Can you make a lattice pie crust ahead of time?
Yes. You can prepare the lattice top several hours ahead and keep the pie refrigerated until ready to bake.
What type of pies work best with a lattice crust?
Lattice crusts are especially popular for fruit pies such as apple, cherry, blueberry, peach, and strawberry rhubarb pies because the openings allow steam to escape during baking.
Why is my lattice crust falling apart?
Pie dough that is too warm or dry can crack and break during weaving. Keeping the dough chilled and properly hydrated makes the strips easier to handle.
Should lattice pie crust have an egg wash?
An egg wash is recommended because it helps the crust develop a rich golden color and slightly crisp texture during baking.
Can you freeze a pie with a lattice crust?
Yes. Many lattice-top fruit pies freeze well before or after baking. Wrap the pie tightly to protect the crust from freezer burn.
How do you keep the bottom crust from getting soggy?
Avoid overly wet fillings and bake the pie on the lower oven rack so the bottom crust receives direct heat. Some bakers also preheat a baking sheet or pizza stone for extra crispness.
Free Shipping on all orders $49+ at Peets.com